Deploying Wordpress to minikube, k3s & k0s
Jumaat, 28 Februari 2025, 9:40 pm
Disclaimer: I’m still learning about #Kubernetes and sharing this based on my current knowledge. There may be parts that I explained incorrectly. If you are more experienced, please feel free to share your knowledge for the benefit of others.
Before
Initially I was hosting my blog using shared hosting:
- Web hosting provider allocates limited resource for each customer account inside a physical or virtual machine.
- Each account had web hosting essentials pre-installed: web server, database, FTP, web panel etc.
- Customer just upload web application to the public directory
Current
Then I migrate to a virtual private server (VPS):
- It’s a single virtual machine dedicated for each customer.
- Depends on the package offered by web hosting provider, some VPS come pre-installed with web hosting software.
- I chose an ’empty’ VPS, which is a basic Linux machine without any web hosting software pre-installed.
- We’re only given SSH access to the VM (virtual machine) and have to set it up ourselves.
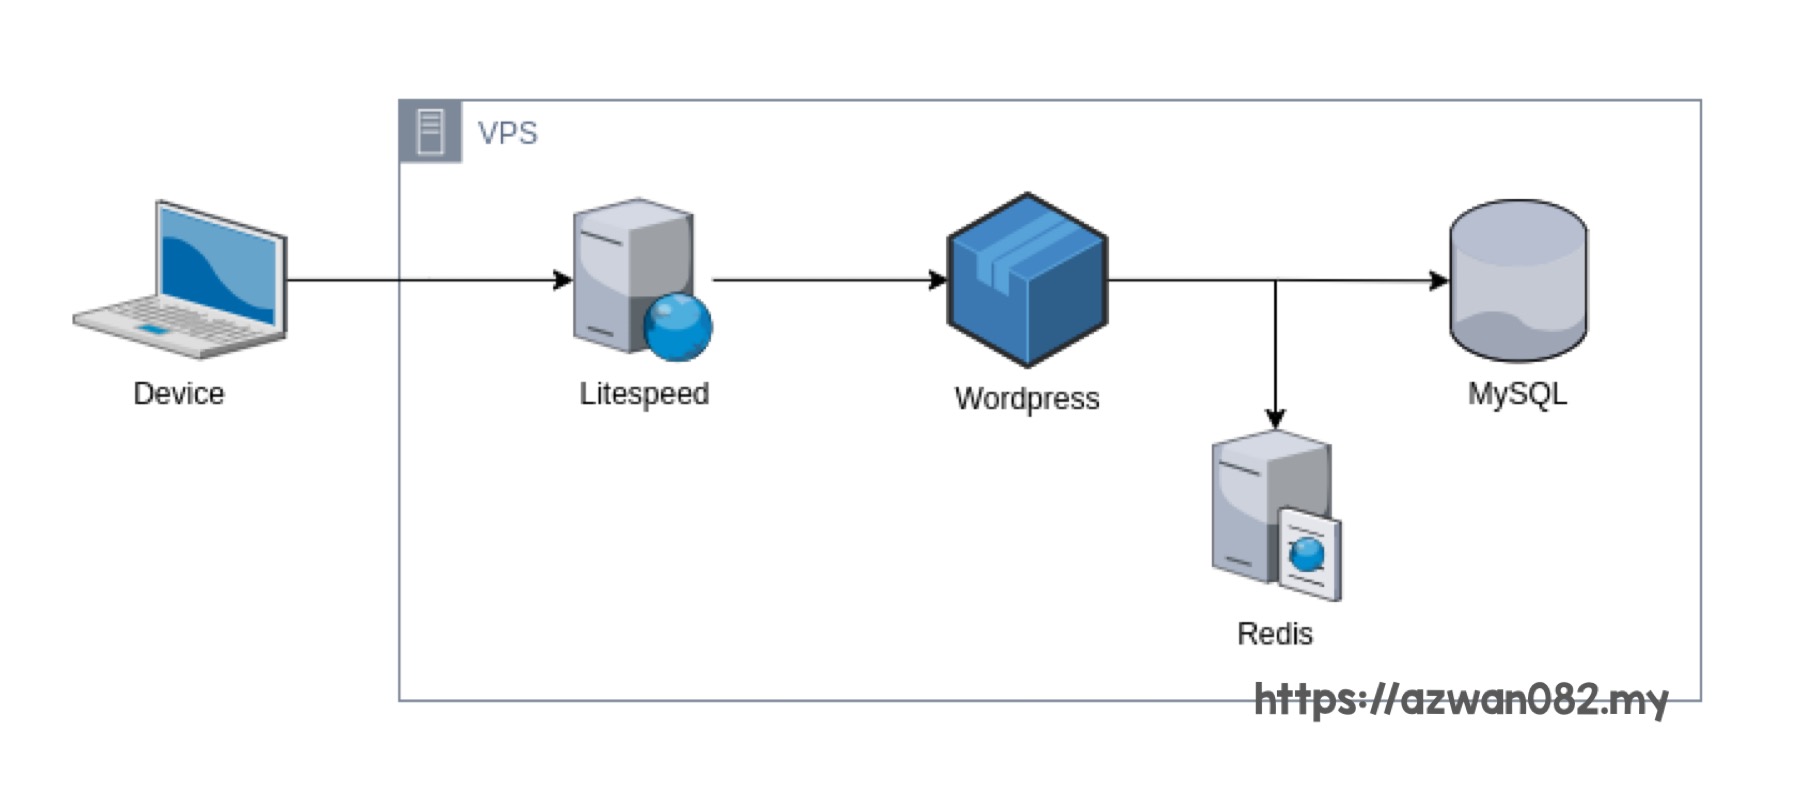
- Currently I’m hosting in a VM installed with webserver (Litespeed), database (MySQL), and caching layer (Redis).
Process flow:
1. User send request to the web server.
2. Web app query data from database, with optional data caching layer in between.
3. Web app process the response & send it back to user’s browser.
Next
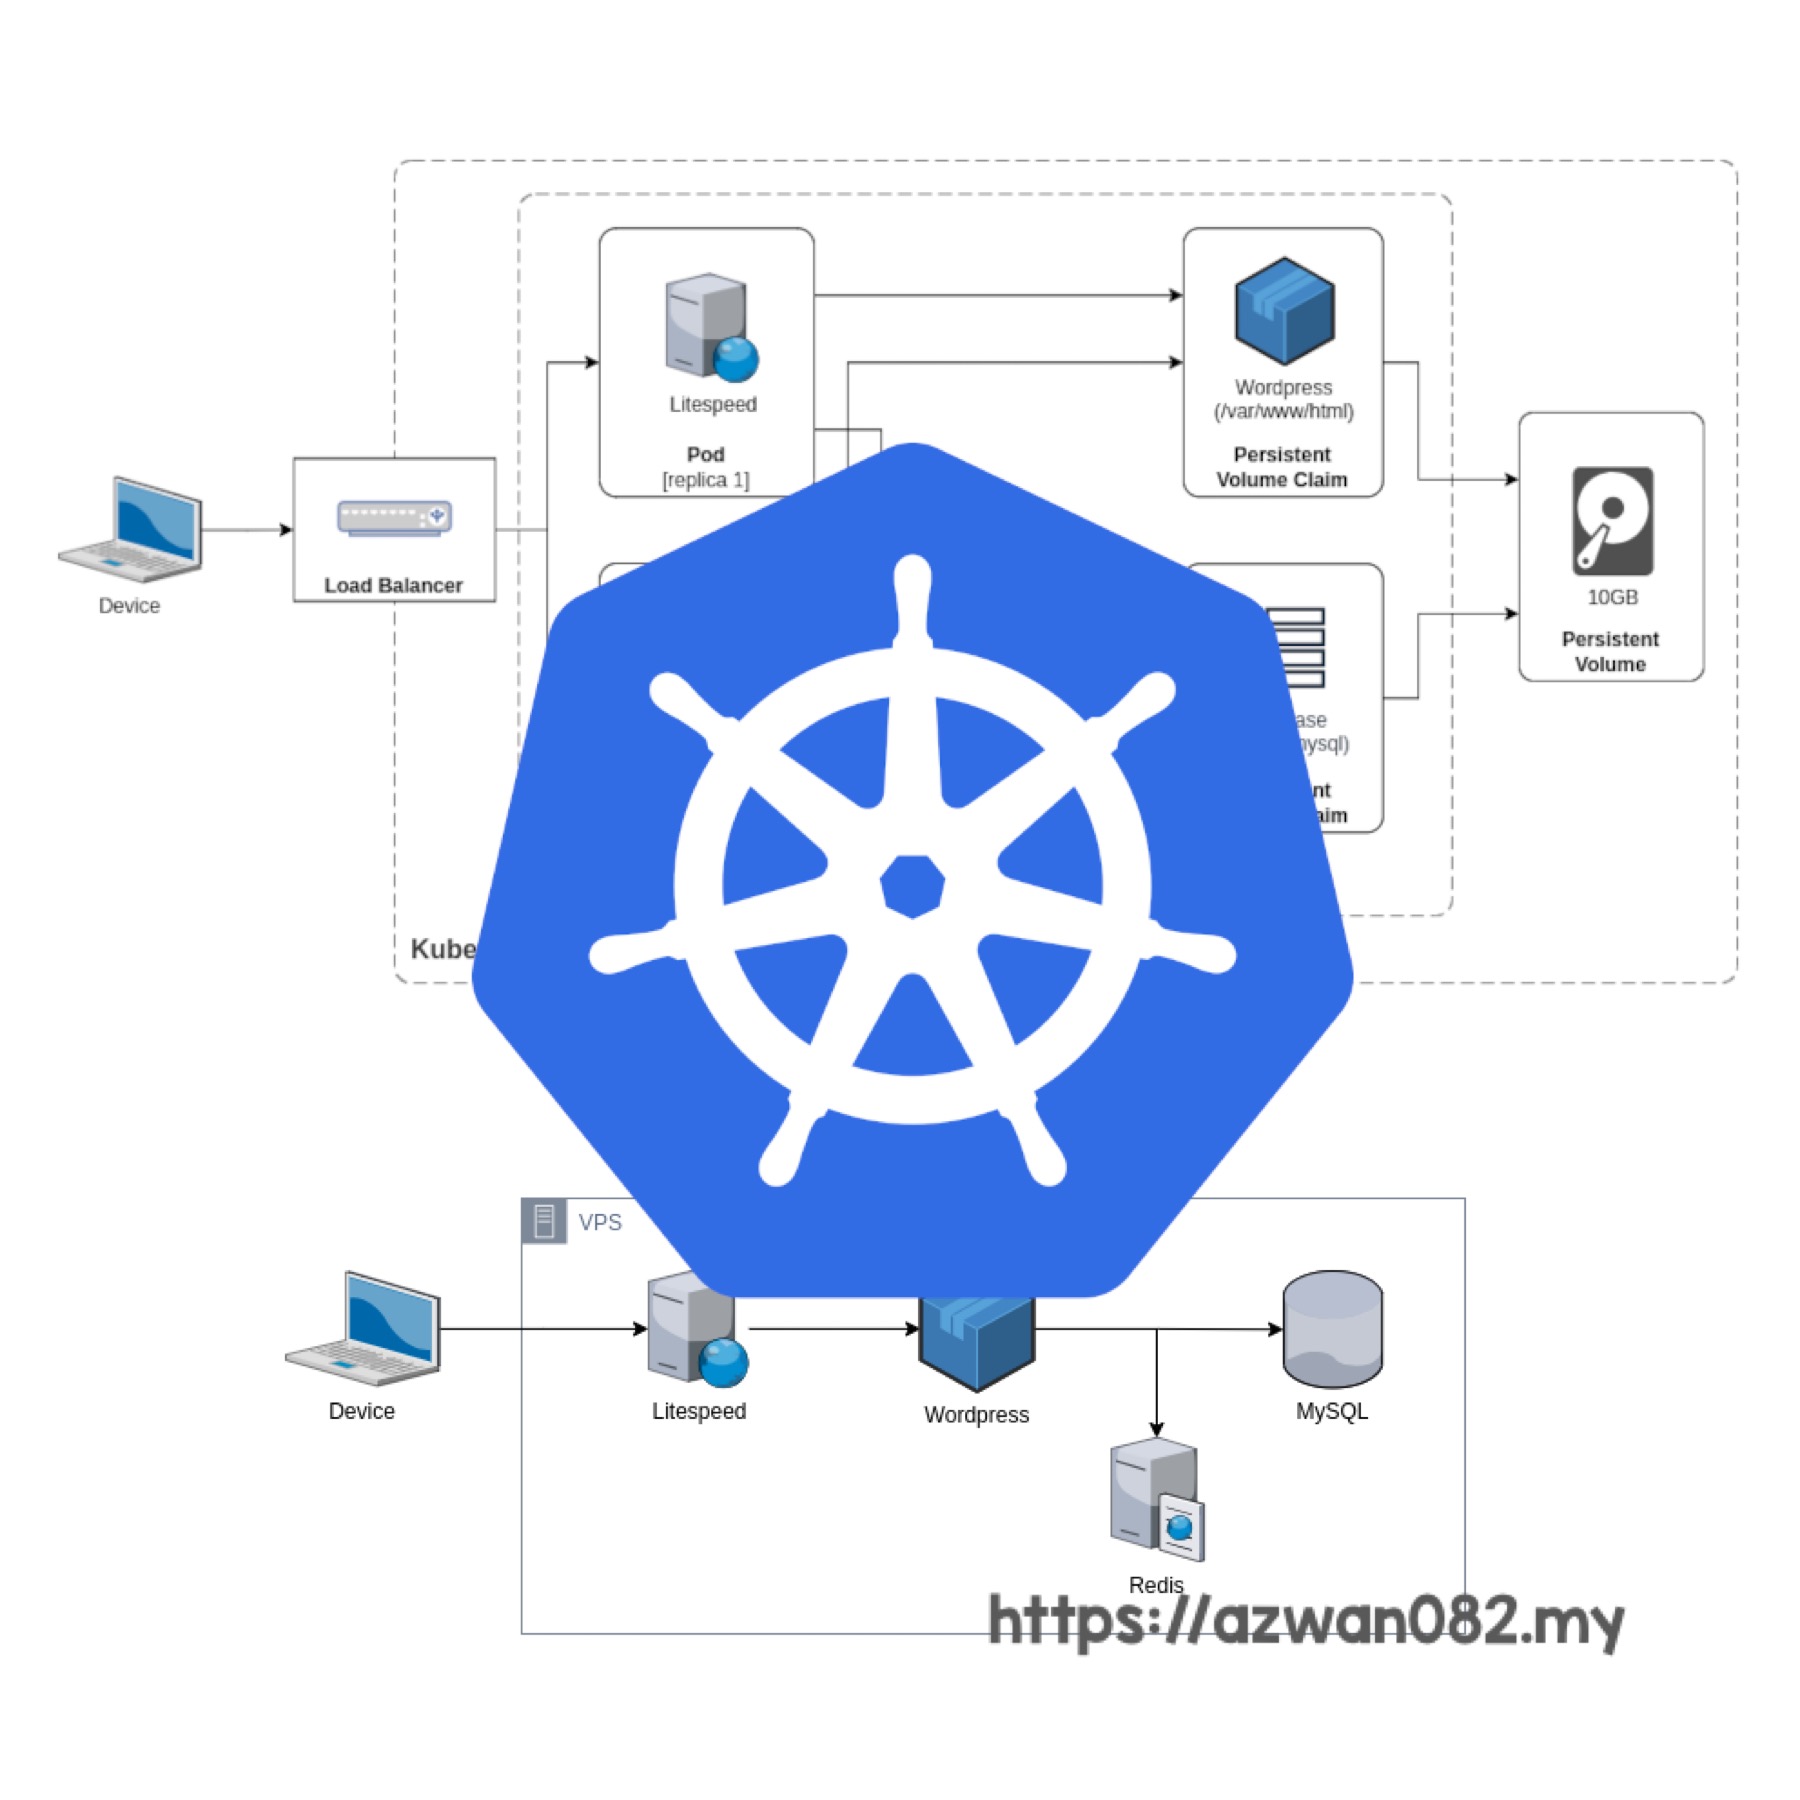
The new method is using container technology, specifically, with Kubernetes as orchestrator.
Process flow is generally similar. However components being used are different. The main reason to use Kubernetes here is to allow scalability & to increase availability.
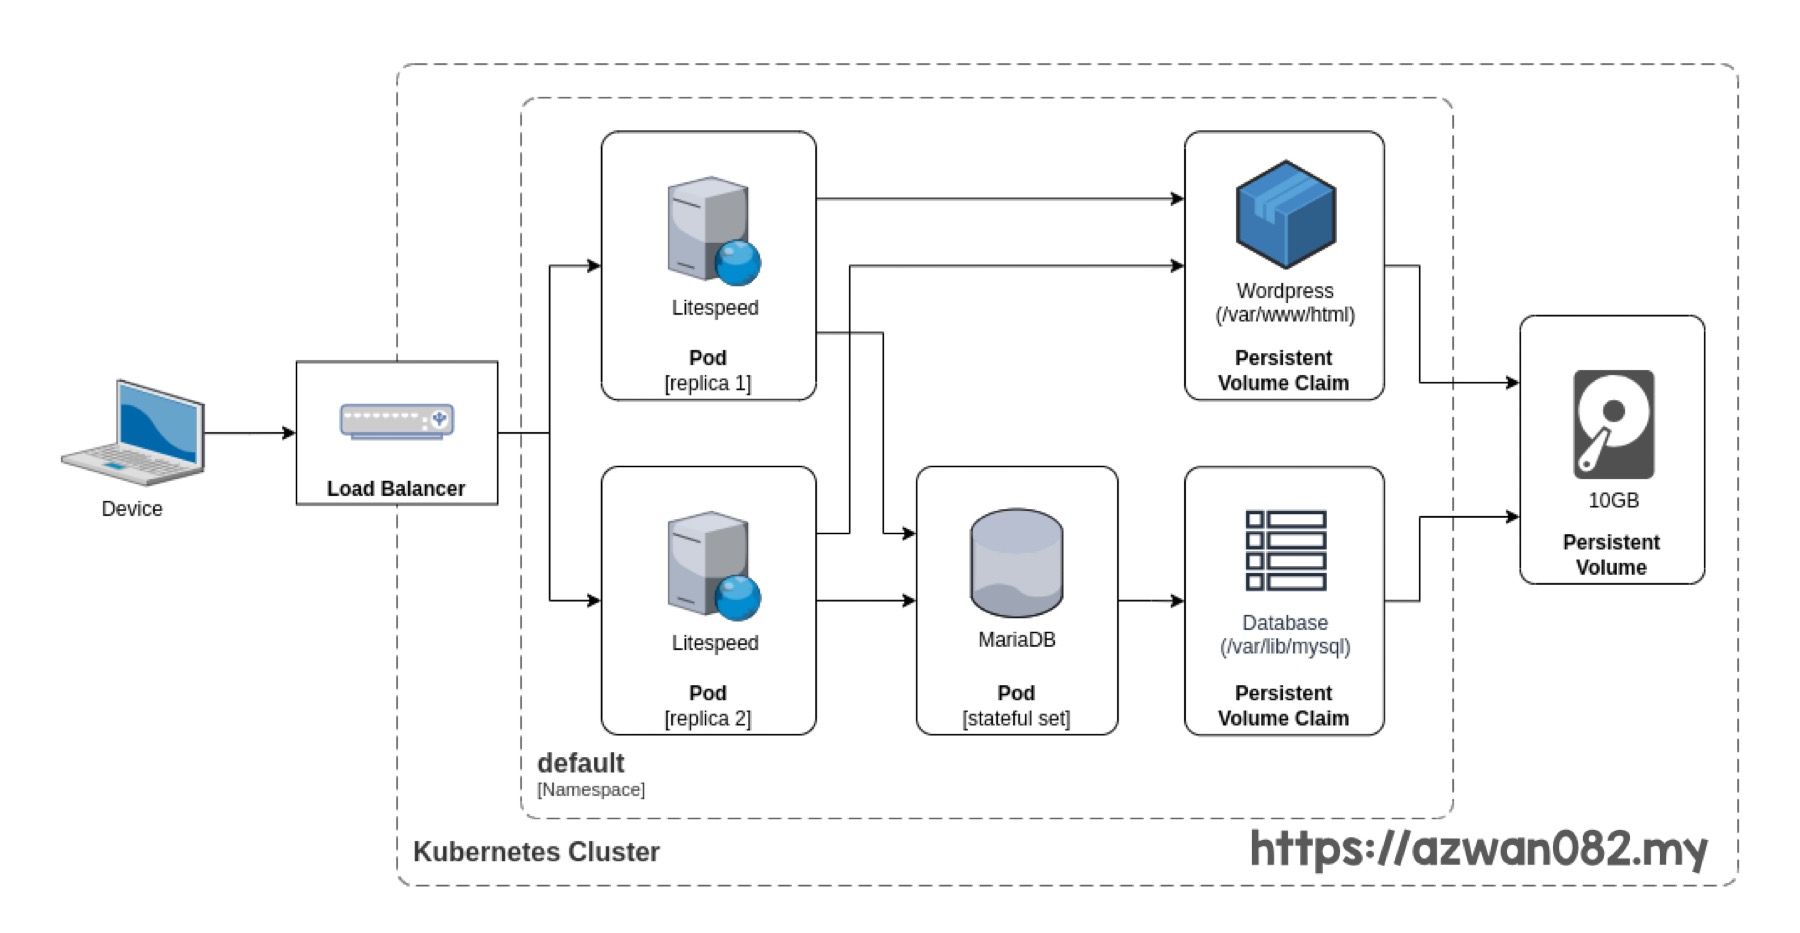
In this article, I’m going to breakdown the steps on how to implement this web hosting architecture using Kubernetes tool & distro available, with criteria as follows:
a) Cluster:
- 1 controller (or controller+worker) node
- 1 worker node
b) Deployment:
- WordPress (2 replicas)
- MariaDB (one stateful set)
c) Persistent volume
- WordPress: /var/www/html
- MariaDB: /var/lib/mysql
In this simple setup, the webserver component (Litespeed) could highlight the benefit of using Kubernetes cluster setup:
- Scalability: to handle more requests, add more webserver
- Availability: if one server down, another server can take over
This setup definitely has rooms for improvements. For example, there will be bottleneck at database layer, because only has one MariaDB instance. It’s a bit tricky to just add more MariaDB instance because it’s using stateful set – different instance will have different dataset, which persist between restarts, and eventually causing data inconsistency. Additionally, WordPress doesn’t have built-in mechanism to connect to which database instance based on load or availability. One way to rectify this is by deploying MariaDB cluster, where WordPress can connect to just one master instance of MariaDB, and MariaDB cluster will distribute the workload among its nodes. However this setup is beyond the scope of this article.
Implementation
There are 3 tool or distro that I’m going to utilize to demonstrate how to deploy WordPress on Kubernetes cluster based on the architecture diagram above:
- Minikube (https://minikube.sigs.k8s.io/)
- k3s (https://k3s.io/)
- k0s (https://k0sproject.io/)
I’m experimenting this on a laptop with this spec:
- OS: Fedora 40
- Processor: Intel i5 11th gen 8 core
- RAM: 16 GB
———
Minikube
It’s a tool to deploy single-node, local Kubernetes cluster. For this experiment, I’m running everything on the laptop. It won’t have the cluster setup as stated in the criteria above, but it’s enough to perform this experiment. Container created by minikube start has this spec:
- CPU: 2 core
- RAM: 4 GB
Step-by-step instruction is based on this reference: https://minikube.sigs.k8s.io/docs/start/?arch=linuxx86-64stablerpm+package
First, clean up previous installation:
minikube delete
Start minikube using #Docker with ingress controller addon:
minikube start --driver=docker --addons=ingress
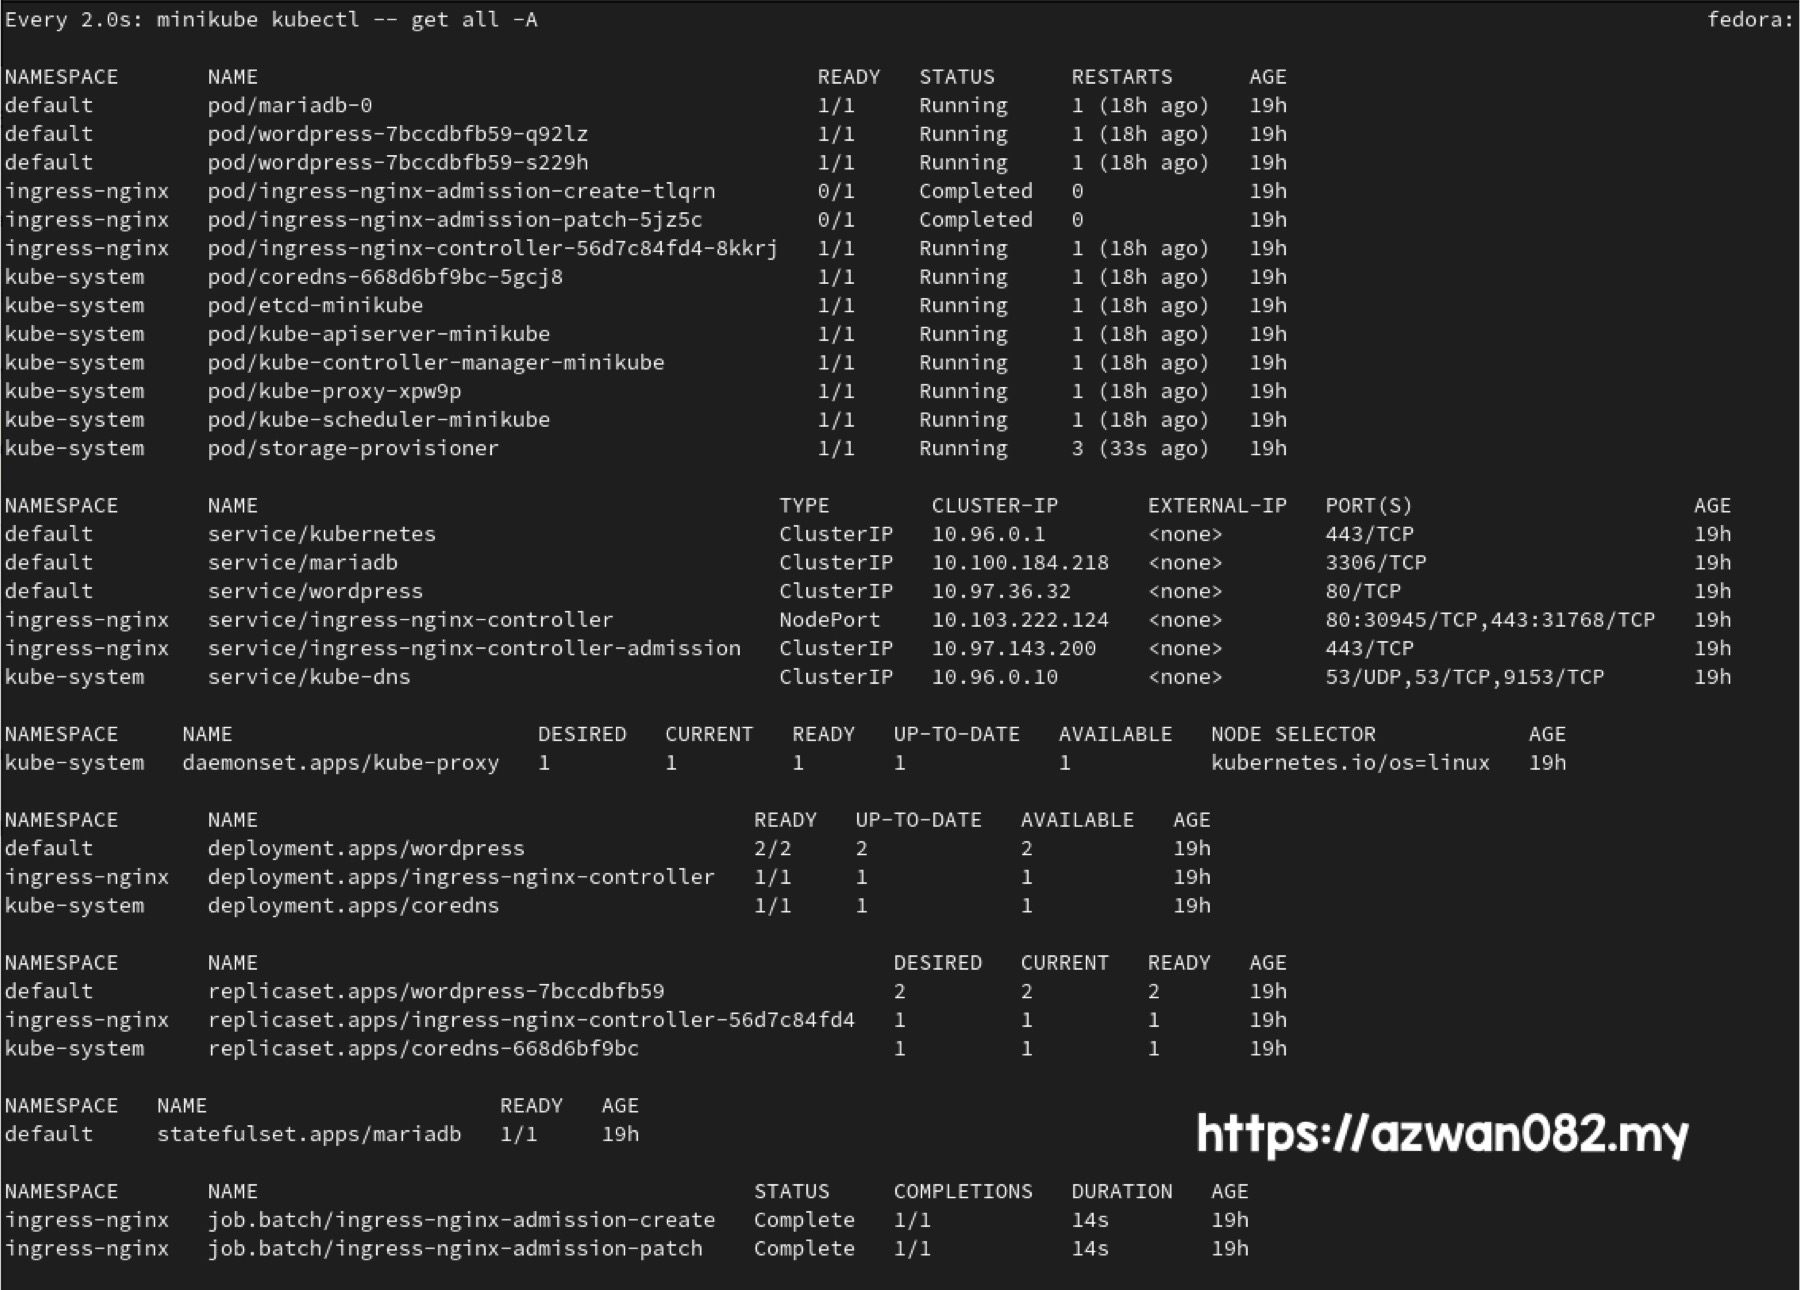
In separate terminal window, run this to monitor the status of the cluster:
watch minikube kubectl -- get all -A -o=wide
I’m using this Kubernetes manifest file (wp.yaml) to deploy the WordPress & MariaDB to the cluster: https://gist.github.com/azwan082/6a09c64ac4ca39da8aedd91b18991c6a
Run this command to apply the manifest:
minikube kubectl -- apply -f wp.yaml
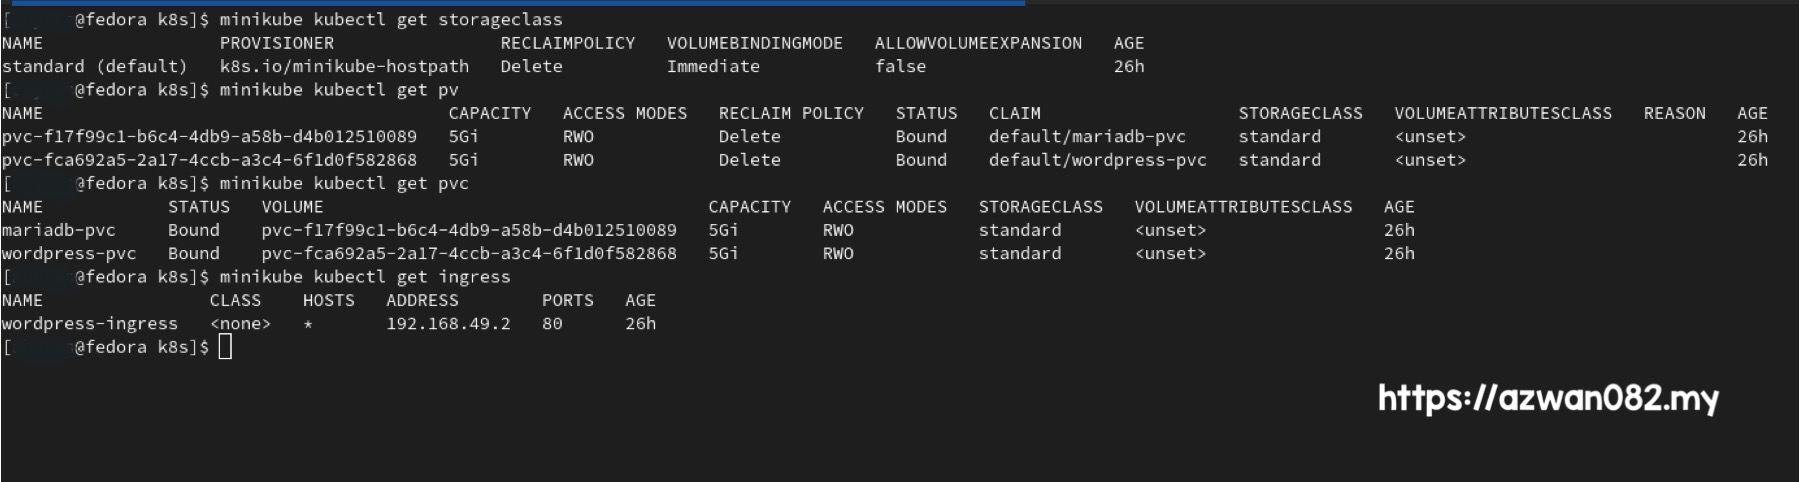
Run these commands to get info about storage volume: storage class, PV (persistent volume) & PVC (persistent volume claim):
minikube kubectl get storageclass
minikube kubectl get pv
minikube kubectl get pvc
Minikube is using minikube-hostpath as volume plugin. There are 2 volumes mounted to the container:
- mariadb-pvc: point to /var/lib/mysql, to store MariaDB data files
- wordpress-pvc: point to /var/www/html, contains WordPress files.
This means for both webserver replicas, the web root directory are actually pointing to the same directory. Using single WordPress installation directory in persistent volume eliminates potential issue with inconsistent & redundant files especially those in plugins folder and uploaded files in wp-content/upload folder.
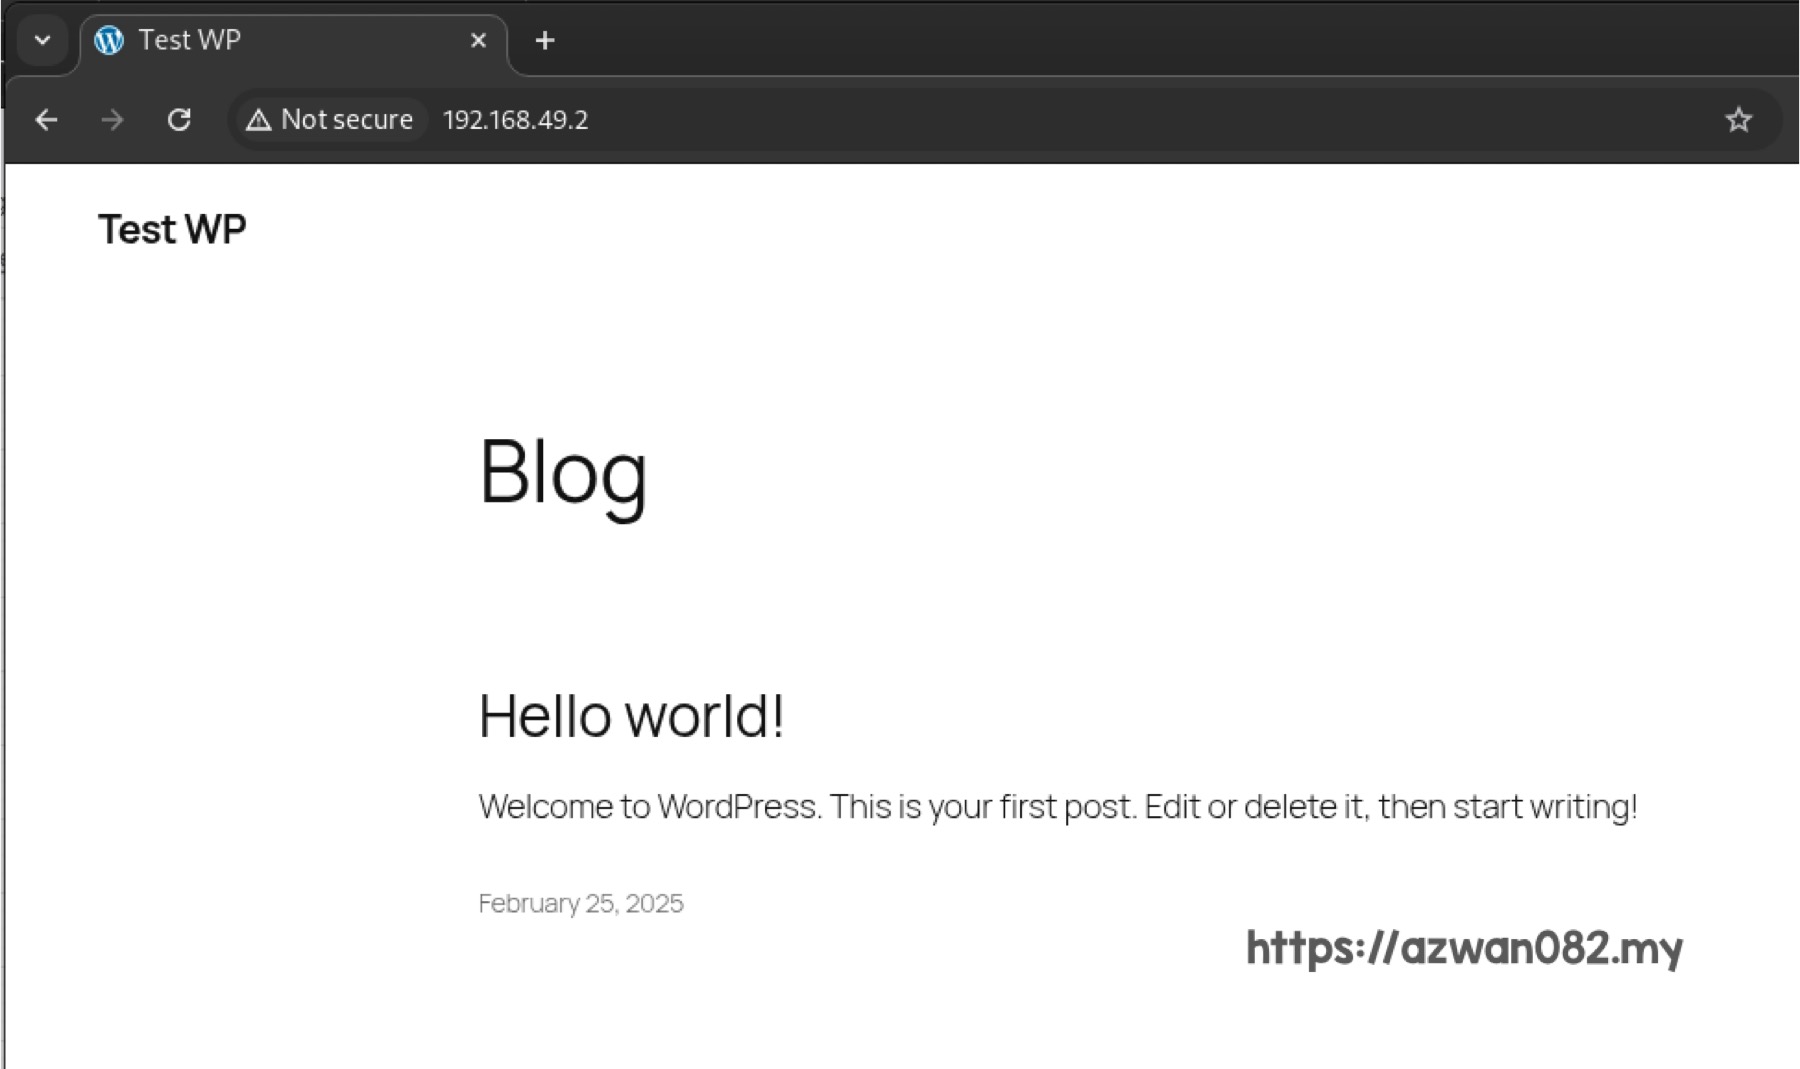
Ingress controller being used by Minikube is nginx. Run this to get the ingress IP address to access the WordPress instance:
minikube kubectl get ingress
———
k3s
It’s a lightweight Kubernetes distro by Rancher Labs. For this experiment, I’m using 2 virtual machines with this spec:
- CPU: 2 core
- RAM: 2 GB
- Storage: 20 GB
It is required to set unique hostname for each of the nodes (VM) within the cluster:
- Controller node: vm-1
hostnamectl set-hostname vm-1
- Worker node: vm-2
hostnamectl set-hostname vm-2
IP address for each machines:
- Laptop: 172.20.254.177
- vm-1: 192.168.122.228
- vm-2: 192.168.122.213
These are the references in order to install k3s, and to uninstall, in case you want to start over:
- Install: https://docs.k3s.io/quick-start
- Uninstall: https://docs.k3s.io/installation/uninstall
Install k3s on vm-1 (controller node)
curl -sfL https://get.k3s.io | sh -
Copy these 2 files from vm-1 to the laptop temporarily. Run this in vm-1:
scp /etc/rancher/k3s/k3s.yaml username@172.20.254.177:~/Documents/k8s/k3s_config.yaml scp /var/lib/rancher/k3s/server/node-token username@172.20.254.177:~/Documents/k8s/
Then copy node-token from laptop to vm-2. Run this in vm-2:
scp username@172.20.254.177:~/Documents/k8s/node-token .
Install k3s on vm-2 (worker node). Remember to update K3S_URL to vm-1 IP address:
curl -sfL https://get.k3s.io | K3S_URL=https://192.168.122.228:6443 K3S_TOKEN=‘cat node-token‘ sh -
Now the k3s installation should be done, we can proceed to deploy WordPress & monitor its progress.
In laptop, go to ~/Documents/k8s folder and run this in separate terminal window to monitor the cluster status:
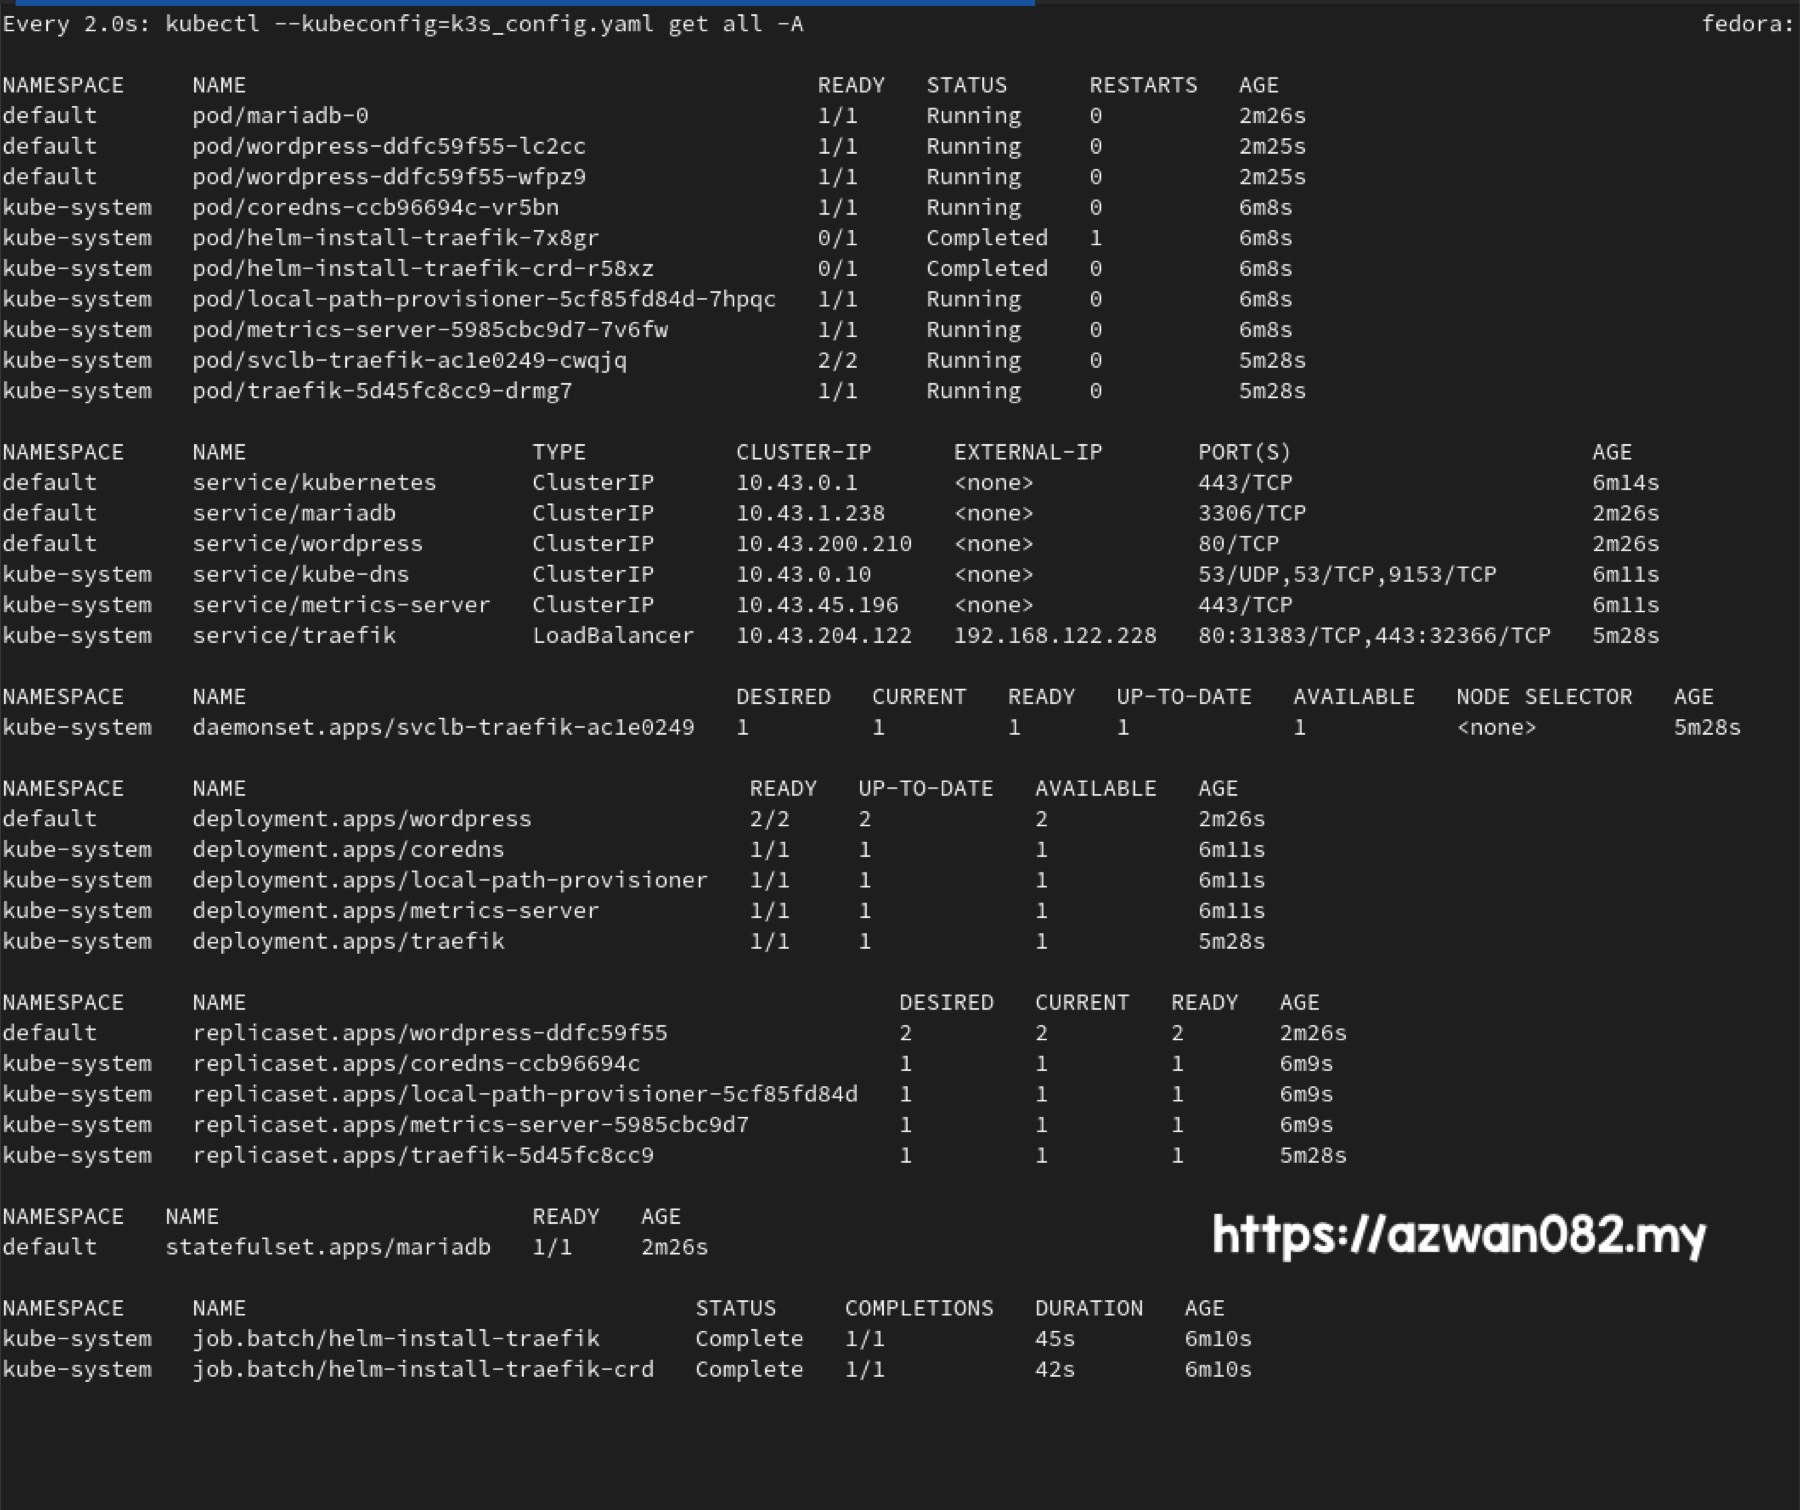
watch kubectl --kubeconfig=k3s_config.yaml get all -A
Using this Kubernetes manifest file (wp.yaml) https://gist.github.com/azwan082/6a09c64ac4ca39da8aedd91b18991c6a, run this to deploy WordPress to the cluster:
kubectl --kubeconfig=k3s_config.yaml apply -f wp.yaml
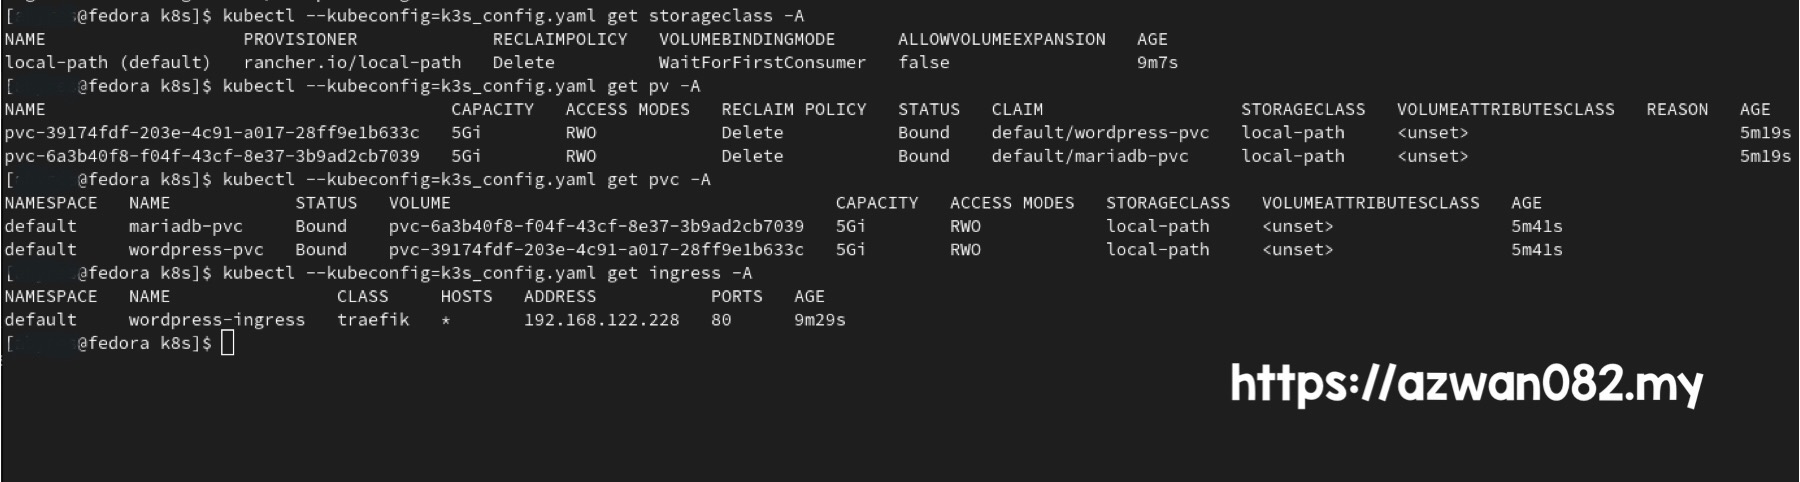
These commands are for getting info about storage class, PV (persistent volume) & PVC (persistent volume claim)
kubectl --kubeconfig=k3s_config.yaml get storageclass -A
kubectl --kubeconfig=k3s_config.yaml get pv -A
kubectl --kubeconfig=k3s_config.yaml get pvc -A
K3s is using its own Local Path Provisioner as storage provider, allowing PVC to be created using local storage on respective node.
K3s is using Traefik as ingress controller and ServiceLB as load balancer. Run this to get the public IP address to access WordPress instance inside the cluster:
kubectl --kubeconfig=k3s_config.yaml get ingress -A
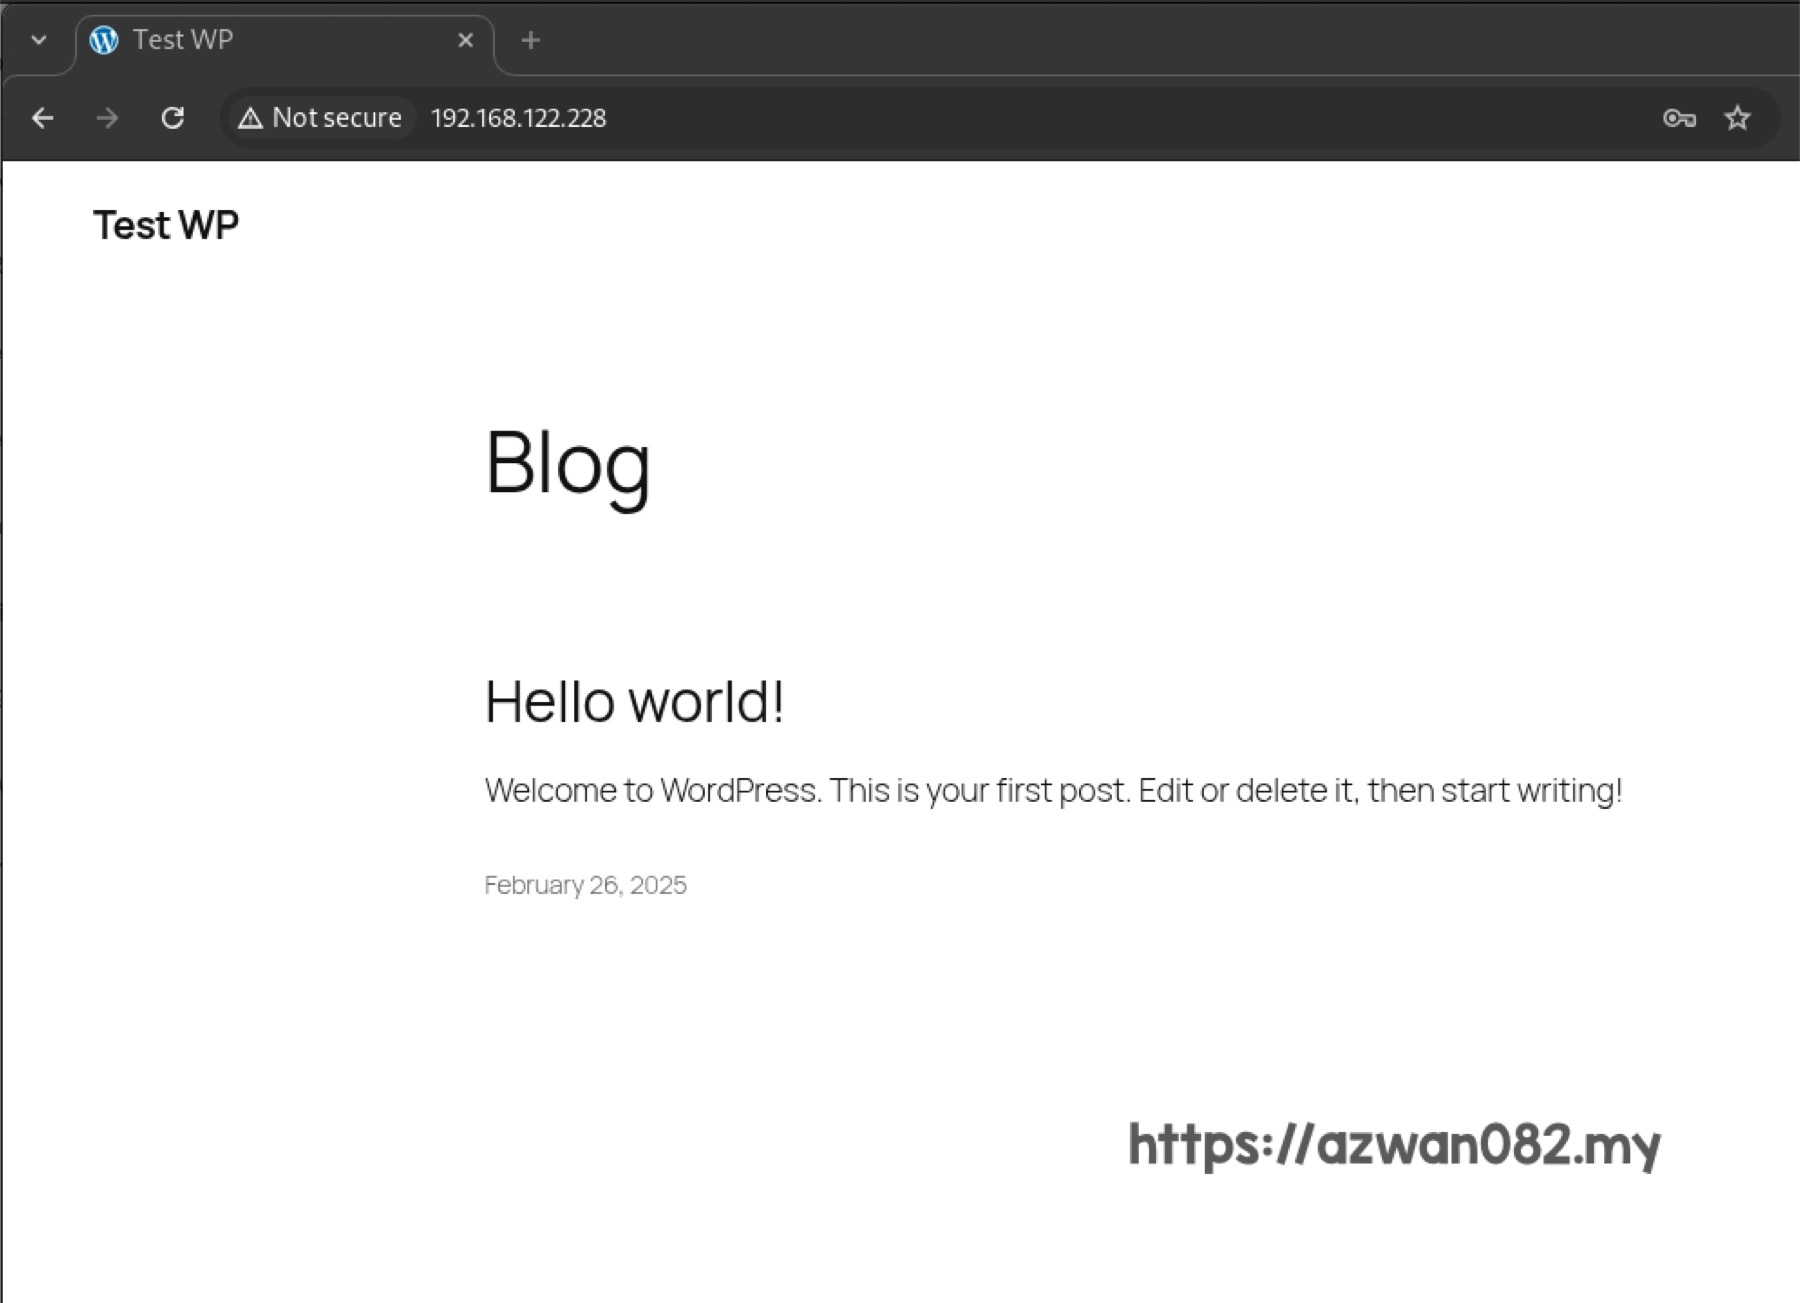
You can also get the IP address from the monitoring command earlier, within section containing EXTERNAL-IP column, look for item with TYPE: LoadBalancer.
———
k0s
It’s a minimal Kubernetes distro, with one attractive key feature: remote deployment. Meaning, you don’t have to login to each nodes & perform the installation steps manually. For this experiment, I’m using 2 virtual machines with this spec:
- CPU: 2 core
- RAM: 2 GB
- Storage: 20 GB
It is required to set unique hostname for each of the nodes within the cluster
- Controller+worker node: vm-3
hostnamectl set-hostname vm-3
- Worker node: vm-4
hostnamectl set-hostname vm-4
IP address for each machines:
- laptop: 172.20.254.177
- vm-3: 192.168.122.141
- vm-4: 192.168.122.144
Pre-requisites for using k0s:
a) First is to setup SSH connection between laptop & VM:
- On laptop, generate SSH public/private key pair. For this example I’m using RSA encryption.
- Copy
~/.ssh/id_rsa.pubcontent and append to/root/.ssh/authorized_keyson all machines.
b) Secondly is to disable firewall on each machines:
sudo systemctl disable firewalld --now
Of course this is ok for development environment. For production, it’s better to leave the firewall enabled & open certain ports to allow connection between nodes:
Install k0s and k0sctl command-line tool in laptop following this reference: https://docs.k0sproject.io/stable/install/
curl --proto '=https' --tlsv1.2 -sSf https://get.k0s.sh | sudo sh
These are the references on how to install & uninstall Kubernetes cluster remotely using k0sctl:
- Install: https://docs.k0sproject.io/stable/k0sctl-install/
- Uninstall: https://docs.k0sproject.io/stable/reset/
Create a k0sctl config file
k0sctl init > k0sctl.yaml
a) Edit the generated k0sctl.yaml:
- Change
ssh.addressfor each VM - First VM, change its
role: controllertocontroller+worker - Set
keyPathto~/.ssh/id_rsa(laptop’s private key)
b) K0s by default doesn’t come with ingress controller, load balancer & storage provider, but in their documentation did provide suggestions & tutorial to install ones:
- Ingress controller: Traefik
- Load balancer: MetalLB
- Storage provider: OpenEBS
c) Install those plugins using Helm extension of k0sctl configuration: https://docs.k0sproject.io/stable/examples/traefik-ingress/
- Change metallb chart from bitnami/metallb to metallb/metallb
- Remove metallb values
- Use kube-system namespace
d) Install OpenEBS persistent storage: https://docs.k0sproject.io/stable/examples/openebs/
All configurations for the ingress controller, load balancer & storage provider above is already included in the sample k0sctl.yaml file: https://gist.github.com/azwan082/2dca590ecb4e9345fde8dcd39406ca89.
Run this to deploy the cluster:
k0sctl apply --config k0sctl.yaml
This command will connect to all nodes using SSH, install k0s, Kubernetes components and plugins configured in the k0sctl.yaml.
In order to use kubectl to access k0s cluster, need to generate its kubeconfig file first:
k0sctl kubeconfig --config k0sctl.yaml > k0s_config.yaml
MetalLB load balancer require IPAddressPool CRD (custom resource definition) to be configured, to specify public IP address range to use. Here’s the sample manifest file (metallb.yaml): https://gist.github.com/azwan082/f5018ceae9a0ec94d95d4016c2527b6b.
Preferably specify IP range in the same subnet as laptop’s IP address. Apply the manifest using this command:
kubectl --kubeconfig=k0s_config.yaml apply -f metallb.yaml

Now we can run this in separate terminal to monitor cluster status:
watch kubectl --kubeconfig=k0s_config.yaml get all -A
Using this Kubernetes manifest file https://gist.github.com/azwan082/6a09c64ac4ca39da8aedd91b18991c6a, run this to deploy WordPress to the cluster:
kubectl --kubeconfig=k0s_config.yaml apply -f wp.yaml
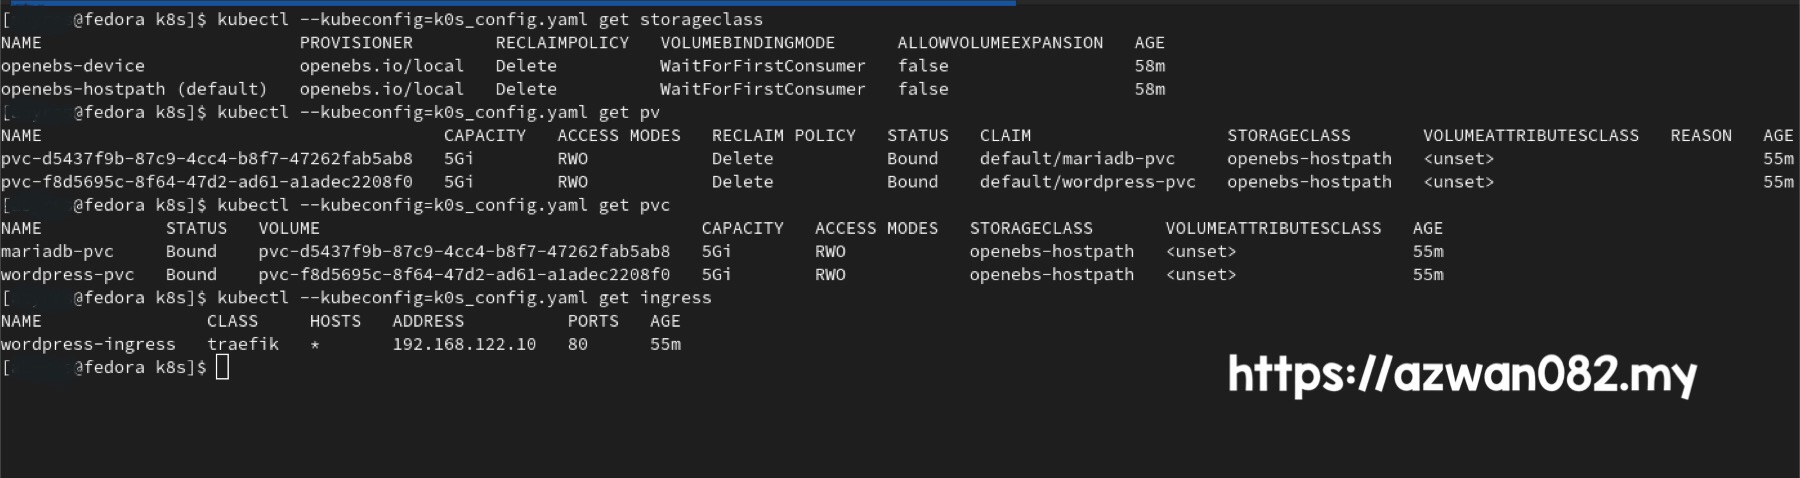
Again, run these to get info about storage class, PV & PVC
kubectl --kubeconfig=k0s_config.yaml get storageclass -A
kubectl --kubeconfig=k0s_config.yaml get pv -A
kubectl --kubeconfig=k0s_config.yaml get pvc -A
Similarly, run this to get the public IP address to access wordpress instance, or find the IP in the monitoring output (EXTERNAL-IP column with TYPE: LoadBalancer)
kubectl --kubeconfig=k3s_config.yaml get ingress -A

1 Mac 2025
25 Februari 2025